Sunday, December 30, 2007

As promised


Any other time that my parents have come to visit (it's a 4 hour drive so it doesn't happen more often than once a year), we'd eaten at home a few times, but mostly went out to eat. Well, that's certainly over and done with.

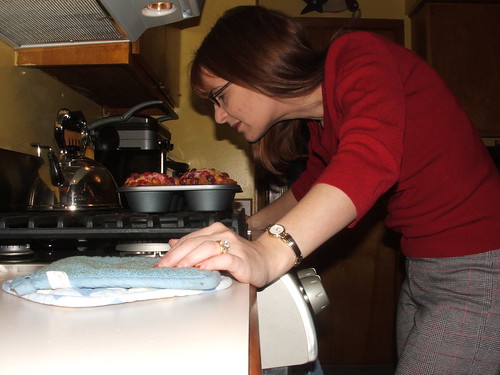
Since they arrived Thursday night, I have cooked a lot. What's weird is that I honestly don't recall making these types of meals for them EVER. I made the pear coffeecake, which turned out well, my favorite pork roast-bread and potato dumplings-sauerkraut meal (also mom and dad's favorite - we have to force ourselves to stop eating or we will stuff face until we're sick), shrimp and parmesan pasta with GF no-knead bread....

We've eaten well. I've probably gained 5 pounds because I haven't eaten this well in quite a while. And I have beautiful leftovers in the fridge. I am really looking forward to frying up the last of the dumplings in butter - oh so good.

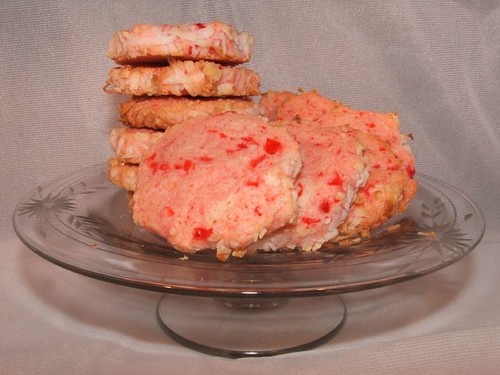
As I had mentioned yesterday, I made the dessert I had presented at Christmas Eve, with one change - I made it in a round cake pan and sliced it into wedges instead of cutting out circles with a biscuit cutter. The Man and I were so full from dinner that only mom and dad ate any, but I will get my turn today.

So. Here's the recipe for that dessert.

Chocolate-Panna Cotta Cake with Cherries
Adapted from The New Best Recipe and Rebecca Reilly's Gluten-Free Baking


For the cake (Rebecca's recipe, a few technique tweaks by me):

2 tbsp potato starch
6 tbsp sifted unsweetened cocoa powder
1 tbsp cornstarch
3 eggs, room temperature
6 tbsp sugar
1/8 tsp salt
2 tsp vanilla
4 tbsp unsalted butter, melted and clarified

Preheat the oven to 325 degrees. Lightly butter an 8" round cake pan and line the bottom with parchment paper.

Mix together (I sifted them together) the potato starch, cocoa powder and cornstarch.

Ribbon together the eggs, sugar and salt (she has an explanation of this in her book, but it's pretty long so I am not going to retype it - sorry). Add the vanilla and reribbon. Add the cocoa mixture in thirds, folding in after each addition. Fold in the clarified butter.

Pour into the prepared pan and bake for 15 to 20 minutes or until a toothpick inserted in the center comes out clean. Cool in the pan.

For the Panna Cotta:

1/2 cup whole milk
1 2/3 tsp gelatin
1 1/2 cup heavy cream
6 tbsp sugar
A 2" section of vanilla bean
Pinch of salt
1/2 cup frozen cherries, chopped

Pour the milk into a medium saucepan. Evenly sprinkle the gelatin over the milk and allow to sit for 10 minutes.

While the gelatin is softening, split and scrape the vanilla bean and place the seeds and pod into the heavy cream.

Prepare an ice bath by placing 4 cups water and 2 cups of ice in a large bowl.

After the 10 minutes are up, heat the milk and gelatin over low heat until the mixture reaches 135 degrees, whisking briskly. Remove from the heat and whisk in the sugar and salt until dissolved. Add the heavy cream to the saucepan.

Pour the panna cotta through a strainer into a bowl small enough to fit into the ice bath bowl without getting any water into the bowl. Add the cherries. Whisk briskly until the mixture has cooled to 45 degrees.

*********

Pour the panna cotta over the top of the prepared cake. Cover and refrigerate for 4 hours. Slice into wedges and grate dark chocolate over the top for serving.

Saturday, December 29, 2007

Mysterious


How is it possible that I am thinking of things to post about every day while Just Not Dinner was not in existence, which drove me nuts, and then since the day it came back, I haven't posted squat!

Very mysterious.

It's not that I didn't have anything to say, or recipes to post. The hectic pace of getting ready for the holidays just got in the way.

But now we are really back.

I made a scrumptious gluten-free dessert for Christmas Eve dinner with The Man's family, but I neglected to take a picture. Even brought the camera with me.

Luckily, I have a parental invasion occuring as I type, and after telling my father about the dessert, he said that it sounded really good. So I have the first half cooling and will begin the second half shortly.

So that will be coming posthaste.

But I also have a delicious coffee cake to share. This is one of those Vault recipes that I dug out recently because I have an abundance of pears taking up space in the fridge. Gotta use them somehow, right?

Pear Coffeecake
Adapted from a recipe in The Vault

2 cups thinly sliced pears
3 tbsp packed brown sugar
1 tbsp + 1 1/2 tsp lemon juice
1/4 tsp cardamom
1/8 tsp nutmeg
1/4 tsp cinnamon
1/8 tsp ginger
1/2 cup brown rice flour
1/4 cup tapioca starch
2 tbsp cornstarch
2 tbsp almond meal
1 tsp xanthan gum
1/2 tsp baking soda
1/8 tsp kosher salt
1/3 cup granulated sugar
2 tbsp butter, softened
1 egg
1 tsp vanilla
1/2 cup milk
1/4 cup sliced almonds

Grease an 8" baking pan (I used a rectangular pan because it was handy, and it affected the thickness because the batter was more spread out. Keep that in mind). Preheat the oven to 350 degrees.

In a small saucepan combing the brown sugar, 1 tbsp lemon juice, cardamom, nutmeg, cinnamon, ginger and pears. Cook over medium heat until syrupy (5 minutes or so), stirring frequently. Set aside to cool.

Sift together the brown rice flour, tapioca starch, cornstarch and xanthan gum. Add the almond meal and set aside.

Combine the milk and 1 1/2 tsp lemon juice; set aside.

In a large bowl, cream together the butter and granulated sugar. Add the egg and vanilla, beating well. Add the flour mixture to the sugar mixture alternating with the milk, beginning and ending with the flour mixture. Beat well after each addition.

Spoon the batter into the prepared pan and spread out until it reaches the sides (dough is kind of sticky so be prepared). Spread the pear mixture over the top of the batter and then top with the almonds.

Bake for 25 to 30 minutes or until cake begins to pull away from the sides of the pan.

Monday, December 17, 2007

We're BAAAAAACK!

I gots all the Christmas presents I need.

Another day to go back to bed & pull the covers over my head


Today started out as any other. The Gidge got me up about 5 AM because of the whole dependent-on-me-for-potty-access thing. I took my allergy pill, brewed up a cup of chai, and sat down to catch up on what’s happening on the web.

I decided about 8 AM to make myself a kick-ass frittata for breakfast. Smoked salmon, spinach, fontina…can’t go wrong there! I whipped everything up, got it into the oven and sat down to read.

Things went downhill quickly from here.

At about 8:45, I pulled the stainless steel pan containing the frittata out of the oven and placed it on top of the stove while I got a knife, fork and plate.

I grabbed the handle of the pan. Without a hot pad or towel.

Yes, people, I did. Did any of you catch the last post before the original Just Not Dinner went “poof?” I talked about needing to be wrapped up in bubble wrap. Tri-ply bubble wrap.

Well, in this case, it would have melted to the handle and to my skin (and I am not sure which would have been worse).

I can’t close my hand right now – I have first degree (thank god that’s all) burns running across my fingers between the top and middle knuckles and again between the middle and bottom knuckles. I also have a nice red stripe across the bottom of my palm.

If this doesn’t prove that I am accident-prone, I don’t know what does.

But I had a damn good breakfast, anyway. I just whimpered in pain between bites.

Smoked Salmon Frittata with Spinach and Fontina

1 tbsp butter
½ cup onion, diced
6 eggs
½ cup milk
1 tbsp Dijon mustard
1 tsp horseradish
1 cup fresh spinach, chopped
4 oz smoked salmon, chopped
½ cup grated fontina cheese
¼ tsp kosher salt
1/8 tsp pepper

Preheat the oven to 350 degrees.

In an ovenproof skillet, melt the butter over low heat. Add the onion and allow to sweat until the onion is soft but not browned. Remove from the heat and add the chopped spinach and salmon.

In a bowl, whisk together the eggs, milk, mustard, horseradish, salt and pepper. Pour over the mixture in the skillet. Sprinkle the cheese over the top and then gently stir to combine all ingredients.

Gently place the skillet into the oven and bake for 35 to 40 minutes, or until the top is browned and a knife inserted in the center comes out clean. Remove from the oven and slice into wedges for serving.

Beware the hot handle, people. Beware.

For the GF cookie tray: surprise package cookies


While I used to enjoy these cookies each Christmas season, they were more important to The Man and The Stepson. I skipped making them last year because of the whole unfamiliar-with-gluten-free-flours thing, but I decided that since I have had other cookie successes, I could slam-dunk this one. And I did. Gluten-eating taste-testers gave these two thumbs up.

Surprise Package Cookies
Adapted from The Vault

½ cup butter
½ cup sugar
1/4 cup packed brown sugar
1 egg
½ tsp vanilla
1 tsp GF baking powder
1/3 tsp kosher salt
2/3 cup white rice flour
1/3 cup tapioca starch
¼ cup cornstarch
2 tbsp sweet rice flour
1 ¼ tsp xanthan gum
1 pkg Andes Candies

In a mixing bowl, cream the butter and sugars together. Add the egg and beat well. Add the vanilla.

In another bowl, sift together the flours, baking powder, salt, and xanthan gum. Slowly add the flour mixture to the butter mixture until completely incorporated. Refrigerate the dough for at least 3 hours.

When you’re ready to bake, preheat the oven to 375 degrees. With rice-floured hands, shape a tablespoonful of dough around 22 candies, forming rectangular cookies. Bake for 10 to 12 minutes or until the cookies just begin to turn golden brown. Cool on wire racks.

When the cookies have cooled, melt the remaining Andes Candies and drizzle over the cookies.

Sunday, December 16, 2007

Point taken

So, after I published the last post, I ended the evening of December 13th with the most priceless kluty move of them all – I accidentally deleted my blog!

I stared at my laptop monitor in horrified fascination, mouth agape, thirty milliseconds after I pressed the “Delete My Blog” button.

I thought I was deleting the test page I had created last March when I was playing around with templates. I had no clue I had selected the wrong blog for deletion.

My heart in my throat, I finally found the “contact Blogger email thing” and started to pray really hard. I had no idea how much I loved Just Not Dinner until it was no more.

I have read around the Net that Blogger is amazingly slow in responding to requests such as mine. I had hoped that my plea was pathetic enough to warrant a quick response as my immediate family kind of uses Just Not Dinner as a way to keep up with me. I covered another base by posting to Blogger’s Help Group thingy.

It’s been a few days now and I haven’t even gotten an email from a Bot yet. So I have decided that for now, I must carry on with the show, even though I don’t have my archives, comments, etc.

When I get my original blog back (please, please, please be soon), I will transfer the upcoming posts to that and everything will be as it should be.

I hope.

Thursday, December 13, 2007

Oh, the agony

Someone needs to encase my ass in bubble wrap before allowing me to even get out of bed.


But before I get to that, the damn Christmas tree is done. I made applesauce-cinnamon ornaments, screwed hooks into walnuts, and strung popcorn and cranberries.


Never again with the popcorn thing. Never again.

Besides, The Gidge has been pretty good about leaving the tree alone after I sprayed everywhere she could reach with Bitter Lime.


And now, without further ado...

How many people do you know that allow their cat to get its mouth on the fishing line you are using to make a popcorn and cranberry garland? And allow said cat to TAKE OFF WHEN THE DOG COMES TROTTING UP, while your fingers are wrapped up in said fishing line?

That left a mark. It's still healing after nearly a week.

Yesterday, while making the bed and simultaneously playing with the dog, I ran full-tilt-boogie into this. The post hits me (yes, this has happened more than once - you'd think I would learn already) right at the spot where the thigh meets the hip.


That left a mark, too. A nice purple, green and black one.


I went to the post office at lunch today to pick up some mail and get a shipping box. While pulling the mail out of my post office box, which is well above my head, the box bit my finger, which would not stop bleeding.


Get the idea?

Bubble wrap, people. I need some.

My innards have not been up to par, either. I have been existing on yogurt, bananas and cream of rice, trying to get back to normal after god-knows-what threw my digestive system off. It's possible that while cooking for the boss on Saturday that I didn't wash my hands well enough after touching her bread and glutened my klutzy butt. Or I have a touch of some stomach bug. Leaning toward the bread and klutzy butt, though.


Anyway.

Tonight I decided that I needed REAL FOOD. To hell with what my stomach might feel like afterward. I rooted through the freezer and came out with some salmon, then poked through the potato bin and the crisper drawers. And ended up with dinner.


Clementined Salmon with Roasted Root Vegetables & Broccoli


For the salmon:
2 large salmon filets
1/4 cup clementine juice (about 2 clementines)
2 tbsp honey
1 tbsp GF soy sauce
Salt and pepper

For the roasted veggies:
1 large potato, cut into 3/4" pieces
1 large parsnip, cut into 3/4" pieces
1 head broccoli, cut into small florets
2 tbsp olive oil
Sea salt and pepper
Asiago cheese (optional)


Preheat the oven to 425 degrees.


In a medium bowl, toss the potato and parsnip pieces with the olive oil. Pour them into a baking dish. Place into the oven and roast for about 20 minutes, or until the potatoes have lost their "raw sheen" and are just barely becoming fork tender.


Place the salmon filets into a baking dish and sprinkle with salt and pepper. In a small bowl, combine the clementine juice, honey and soy sauce. Pour the mixture over the salmon and set aside. Place into the oven after the vegetables have been in the oven about 15 minutes. Spoon some of the clementine mixture over the top of the salmon every 5 to 8 minutes.


Steam the broccoli until just barely fork-tender. You can do what I did - use the microwave. Those new steam bags can be a handsaver when you don't have a dishwasher, like me.


When the potatoes and parsnips have begun to brown, add the broccoli to the mix. Continue to bake until the broccoli just barely browns and the salmon is cooked through, about 10 minutes (more if your salmon filets are pretty thick).


When serving, sprinkle the vegetables with asiago cheese, sea salt and pepper to taste.


Oh. Did I mention that I also broke a nail the other day? Better get a triple roll of that bubble wrap.

Thursday, December 06, 2007

The only time you will see me eat gravy

At some point during my childhood, I had a bad gravy experience. I remember doing my normal drowning of the mashed potato mound on my plate, taking a huge bite, and spitting the mouthful back out.

Was it overly salted? Generally nasty? I dunno. I was maybe 10 when this happened, so I have been essentially gravy-free for 26 years. Except for the gravy in beef stew.

I haven't had the inclination to make stew in several years. The furnace at my office has been uncooperative for a week, so we froze until yesterday, when my co-worker and I decided that we were being stupid and went home to work for the rest of the day. Today, I am feeling a bit under the weather, so I am snuggled up with The Gidge, tea and my laptop, plugging away at the work pile that only seems to get taller every day.

The thought struck me about 9 AM - something to nosh that isn't a lot of work but sticks to the ribs.

Have I mentioned that it's very, very cold outside?

On a side note, The Gidge was introduced to real, measurable snow on Tuesday night. The Man and I had a good belly laugh because she ran around like an idiot. Her little black face was white with snow because she kept shoving it into the cold stuff. We take her out with her little white coat and pink booties - particularly this morning, when it was only about 10 degrees. As long as she's got the boots and the coat happening, she romps through the snow like a pro. Take those off and she pussyfoots her way to the area we shoveled off for her use and then, with a long-suffering look at me, trudges her way back to the door.

Yes, we shoveled the grass. The snowfall we received Tuesday night comes up to her armpits....legpits....ah hell, her tummy.

Back to food. I had things lurking in the fridge from last week's organic delivery that needed to be used: parsnips, potatoes, carrots, onions. I had green beans from the garden that I had frozen during the summer. Ah, the makings of stew!

I also had a little bit of merlot in a bottle on the counter. I was all set. So I whipped up a batch of no-knead bread and set it to rise (no way was I waiting 18 hours - I set the bread proof cycle on my oven and popped it in there for 4 hours before baking).

Gotta have crusty bread to sop up the stew gravy.

Sorry for the crappy picture - forgot to take one until I was preparing to put the leftovers in the fridge.


Beef Stew - My Way
For the CrockPot

1 pound beef stew meat
3/4 cup diced onion
1 cup diced carrots
2 tbsp butter
2 tbsp olive oil
1/4 tsp salt plus a pinch or so
1 cup diced parsnips
1 cup diced red potatoes
4 cloves garlic, minced
1 cup green beans, cut into 1" pieces
1/2 cup cornstarch
2 cups beef stock
1 cup red wine
1/2 tsp ground thyme
2 bay leaves

In a large skillet, melt the butter and olive oil together over medium heat. Add the stew meat, a pinch of salt, and onion; cook until meat is browned and onion is tender (about 10 minutes). Add the garlic and cook for another 2 to 3 minutes. Remove from the heat and add the cornstarch; toss to coat. Add the mixture to the CrockPot.

Pour the beef stock and wine over the meat mixture. Add the the remaining ingredients and then stir together. Cover and set the CrockPot to cook for 6 hours on high heat.

Don't forget to fish out the bay leaves before serving.

Saturday, December 01, 2007

For the GF cookie tray: santa's whiskers


Yesterday, I came up with a solution for the Christmas tree/The Gidge problem. I swung by the local dollar store on the way home, loaded up with cheap cinnamon and applesauce, and went home to make ornaments.
It's actually pretty easy. You combine two 2.12 bottles of cinnamon with 1 cup of applesauce, mix into a dough, roll it out, and cut into shapes (poke holes in the tops using a straw in order to hang them later). Then you have to either let them dry for days, flipping several times a day, until they are dry all the way through, or you can do what I did, which was heat the oven to 250 degrees, throw them in there, and let them dry with some help. I tried the hang-out-and-dry method, but because of my allergies and Vester's asthma, I keep humidifiers running at all times throughout the house. So when you have 50% humidity going on, that's not exactly the best environment to dry out dough.

One of the ladies at the beauty parlor I go to (believe me, it's a beauty parlor, not a "salon") has a bow-making thing so she made me a huge bow to go on top of the tree.

The ornaments are dry now and I have to run back to the dollar store to get a ton more ribbon (I bought some that says "I believe in Santa" that's red, white and silver - the normal colors of my tree) so I can get the ornaments strung in preparation for hanging. Oh, and we need to put screws in the tree base so I can put down my tree skirt.

Did I mention that before? Mysteriously, when the tree was taken back downstairs last year, the screws that tighten the stand disappeared. So our tree is waving in the breeze right now. I caught Baby climbing the inside the other night because the whole thing was moving.

Anyway, once the tree is done, maybe I will feel like hauling out the rest of the indoor decorations.

The weather has been uncooperative this weekend as far as outdoor decorating goes. When I went to my GF support group meeting this morning, it was cold. When I left the meeting at about noon, it had been snowing a bit but was changing over to sleet. It took me 45 minutes to get home because I couldn't drive any faster than 30 mph the whole way or the SUV started to slide.

It's now 7:46 PM. I took The Gidge out to go potty a few minutes ago and it's raining. On top of snow and sleet. The deck and brick patio are sheets of ice. I have a very bad feeling about this - remember, I have advanced osteoporosis and am the biggest klutz in the world. I am tempted to see if The Man can find a sled downstairs or in the shed so I can PUSH myself across the deck.

After drying out the last of the ornaments this morning, I made my first attempt at de-glutening my Santa's Whiskers recipe. I will say that it took a lot longer to chill than the gluten version so I ended up chucking it in the freezer for an hour (after refrigerating for 6) to get the dough firm enough to slice without mushing the log.

Success once again! The only thing I would do different is add more vanilla extract, so I increased the amount in the recipe below.

Santa's Whiskers
From The Vault

The amounts may seem weird here - this is a third of the original recipe because I am the only one that eats these cookies, so I sure as heck don't make the whole batch.

1/4 cup butter, softened
1/4 cup shortening
1/2 cup sugar
1/16 tsp baking soda (a good pinch)
1/16 tsp kosher salt (a good pinch)
1 egg
1 tbsp milk
3/4 tsp vanilla
1/2 cup white rice flour
1/3 cup tapioca starch
1/3 cup cornstarch
1/3 cup sweet rice flour
1 1/4 tsp xanthan gum
3/4 cup maraschino cherries, drained well and finely chopped
1/2 cup coconut

In a mixing bowl, cream together the butter, shortening and sugar on medium speed for two minutes. Add the baking soda and salt. Beat until combined and then add the egg, milk and vanilla.

Sift together the white rice flour, tapioca starch, cornstarch, sweet rice flour, and xanthan gum. Slowly add the flour mixture into the butter mixture, beating well. Add the chopped cherries and mix well. The dough will turn pink, so don't freak.

Now comes the fun part. This used to be pretty simple. And then there are gluten-free flours.

Place a large piece of waxed paper on the counter. Scoop large spoonfuls of the dough into a log-type shape. Sprinkle all available surfaces with coconut and press it into the dough, gently. Once you get the top and sides done, use a rubber scraper or spatula to carefully lift the dough in order to get coconut on the bottom. Once the entire roll has been coated in coconut, use the waxed paper to roll it into a 1-1/2" by 8" to 9" log. Twist the ends to seal and place in the refrigerator for at least 6 hours, but overnight is probably better. Or you can put it in the freezer until the dough is firm to the touch but not frozen solid.

When you're ready to bake the cookies, preheat the oven to 375 degrees. Prepare a baking sheet by lining it with parchment.

Remove the dough from the fridge and slice it, using a sharp knife, into 1/4" slices. Lay the slices on the baking sheet about an inch apart. Bake for 10 minutes or until the coconut has begun to toast, the edges are barely browned, and the middle of the cookies seem firm to the touch.
Makes about 36 cookies.